Monday: Rotisserie Chicken, Caprese Salad
Tuesday: Grilled Kielbasa, Pieorgi, Roasted Broccoli
Wednesday: Leftovers
Thursday: Enchiladas, Corn Cake
Friday: BBQ Chicken, Pasta Salad
Saturday: Grilled Pork Chops, Rice Pilaf, Peas
Sunday: BBQ Party at our house! Hamburgers, Italian Sausage, Potato Salad, Corn on the cob
Sunday, May 22, 2011
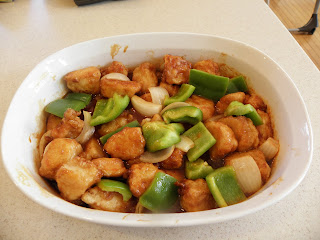
Sweet & Sour Chicken
I love this recipe. It's a little messy to make with the frying, but it is the best homemade sweet and sour chicken I've ever had. I'm not usually a fan of Asian food made at home, I always feel its better at the restaurant, but this is one that is on the regular rotation at our house. Serve with rice and egg rolls and it's just like takeout!
INGREDIENTS

Source: My Happy Meals

INGREDIENTS
- 4 boneless, skinless chicken breasts
- Salt and pepper
- 1 cup cornstarch
- 2 eggs, beaten
- 1/4 cup canola oil
- Onion, cut into chunks
- Green pepper, cut into chunks
- Pineapple
- ¾ cup sugar
- 4 tablespoons ketchup
- ½ cup vinegar
- 1 tablespoon soy sauce
- 1 teaspoon garlic salt
Cut boneless chicken breasts into chunks. Season with salt and pepper. Dip chicken in cornstarch and then in egg. Fry in a little oil until brown but not cooked through. Place in a single layer in a baking dish.
Mix sauce ingredients together and pour over chicken. Add in onion.
Bake for one hour at 325 degrees. Add in green pepper and pineapple for the last 30 minutes of cooking.

Source: My Happy Meals
Crispy Chicken Tacos
When I found this recipe, I knew it was going to be a favorite. We all love Mexican food, but get bored with tacos and enchiladas and we like to try something new. These crispy chicken tacos were perfect! A cross between a tacquito and a hard taco, they were enjoyed by everyone.

INGREDIENTS

INGREDIENTS
- 4 Chicken Breasts, diced
- Salt, Cumin, Chili Powder To Taste (or Use Taco Seasoning)
- 2 Tablespoons Canola Oil
- 2 cans (4 Ounce) Diced Green Chilies
- 1-½ cup Finely Grated Cheese (cheddar Or Cheddar/jack Mix)
- Sour Cream
- Hot Sauce (optional)
- Thinly Sliced Romaine Lettuce (or Any Lettuce)
- Tomatoes, Diced
- Canola Oil, For Frying Tacos
Season diced chicken liberally. Heat 2 tablespoons oil in large skillet over medium-high heat. Add the chicken and cook for a couple of minutes. Add in the diced green chilies. Stir and cook until chicken is totally done inside. Turn off heat and set aside.
Have all other ingredients—grated cheese, sliced lettuce, diced tomato, sour cream, and hot sauce—ready.
Also have a plate ready, as well as a stack of five or six paper towels to hold in your hand.
**Be very careful when frying with hot oil!**
To fry the tacos, heat a couple of inches of canola oil in a heavy skillet over medium-high. Place some chicken in the middle of a tortilla, then fold tortilla in half. Clamp the tortilla shut with a pair of heat-proof metal tongs, then carefully lay the taco—one side down—in the oil.
As you lay it in the oil, use the tongs to hold the top side down for a few seconds to form it in place. Once it stays put, repeat with two other tacos. Turn tacos after 30 to 45 seconds, or when each side gets light golden brown (not too brown.)
One at a time, remove tacos from the pan with tongs, holding sideways as you remove them to allow oil to drip out of the sides. Place the taco in the stack of paper towels. Fold the sides and corners around the taco to tightly hold it, then give it three or four shakes to remove excess oil. Remove it from the paper towels and place on a plate. Repeat with other tacos in the pan.
As you continue frying the other tacos, have someone carefully place some grated cheese inside the tops of the tacos (gently pry them open just enough to place the cheese in). Then just let them sit until ready to serve—the cheese will melt as it sits in the warm taco.
Tacos will be hot for a minute or two after frying. They stay warm for a while after frying, so serve with the garnish of your choice and enjoy!
Source: Pioneer Woman
Monday, May 16, 2011
Weekly Menu
Monday - Spaghetti & Meatballs, Garlic Bread, & Caesar Salad
Tuesday - Chili & Corn Muffins
Wednesday - Leftovers
Thursday - Sloppy Joe's & Sweet Potato Fries
Friday - Sweet & Sour Chicken, Rice, Egg Rolls
Saturday - Pulled Pork w/ Mac & Cheese
Sunday - Chicken Cordon Bleu, Spinach Salads
Tuesday - Chili & Corn Muffins
Wednesday - Leftovers
Thursday - Sloppy Joe's & Sweet Potato Fries
Friday - Sweet & Sour Chicken, Rice, Egg Rolls
Saturday - Pulled Pork w/ Mac & Cheese
Sunday - Chicken Cordon Bleu, Spinach Salads
Sunday, May 8, 2011
Weekly Menu
Monday: Grilled Hamburgers & Oven Fries
Tuesday: Pasta Fresca
Wednesday: Leftovers
Thursday: Grilled Hot Dogs, Baked Beans, Chips
Friday: Homemade Pizza
Saturday: Out
Sunday: Baptism Party
Tuesday: Pasta Fresca
Wednesday: Leftovers
Thursday: Grilled Hot Dogs, Baked Beans, Chips
Friday: Homemade Pizza
Saturday: Out
Sunday: Baptism Party
Homemade Restaurant Style Salsa
This is one of the best salsa recipes that I have ever made. It tastes just like the fresh salsa from a mexican restaurant. It's super simple to make and with ingredients that you usually have in your pantry. Enjoy!

Ingredients
14 oz. can whole tomatoes with juice
10.5 oz. can of Rotel
1/4 chopped onion
1 clove garlic
1/2 jalapeno
1/4 c. cilantro
Juice from 1/2 of a lime
1/4 tsp. salt
1/4 tsp. sugar
1/4 tsp. ground cumin
Add all ingredients to a food processor. Pulse until you get the desired consistency (approx. 10 pulses). Refridgerate for at least 1 hour before eating to let the flavors blend.
** If you prefer milder salsa, remove the seeds and membranes from the jalapeno before adding to the food processor.
Source: Pioneer Woman
Wednesday, May 4, 2011
Shrimp Ceviche Cocktail
With Cinco de Mayo just a few days away, this recipe is a great addition to any Mexican theme night you have. A mix between traditional shrimp ceviche and shrimp cocktail, the salad is refreshing and delicious!


- 1 quart salted water
- 1/2 cup plus 2 tablespoons freshly squeezed lime juice
- 1 generous pound small shrimp (about 41 to 50 count to a pound)
- 1/2 medium white onion, diced
- 1/3 cup chopped fresh cilantro, plus several sprigs for garnish
- 1/2 cup ketchup
- 1 to 2 tablespoons hot sauce
- About 2 tablespoons olive oil
- 1 cup peeled, diced cucumber
- Salt
- Several lime slices, for garnish
Bring 1 quart salted water to a boil and add 2 tablespoons of the lime juice. Add shrimp, cover and return to a boil. Immediately remove from heat, drain the liquid, leaving the shrimp in the empty pot.
Replace lid and set aside, letting shrimp steam in closed pot for 10 minutes. After steaming, transfer shrimpt to a bowl and cool completely. Peel and devein shrimp (if needed).
Toss shrimp with remaining 1/2 cup lime juice, cover and refrigerate for about 1 hour.
In a small strainer, rinse chopped onion under cold water, then shake off excess liquid. This mellows the raw onion flavor.
Add chopped cilantro, ketchup, hot sauce, olive oil, cucumber, and onion to a bowl. Mix gently, taste and season with salt, usually about 1/2 teaspoon. Stir in shrimp.
Cover and refrigerate up to a few hours, or serve immediately.
Recipe adapted from Rick Bayless
Fresh Fruit Tart w/ Vanilla Pastry Cream
If you are looking for a summer dessert to impress people, this is it! This is not a quick and easy dessert but the effort is completely worth it. This is perfect to serve on a warm summer night after a BBQ with friends. I wuold recommed making the tart dough and pastry cream the day before. There are alot of steps and wait time with this recipe so you want to make sure you have enough time to do all the steps without having to worry about the rest of your menu.

For the tart dough:

- 1 large egg yolk
- 1 tbsp. heavy cream
- 1/2 tsp. vanilla extract
- 1 1/4 cups all-purpose flour, plus more for dusting the work surface
- 2/3 cup confectioners’ sugar
- 1/4 tsp. salt
- 8 tbsp. cold unsalted butter, cut into 1/2-inch cubes
For the Pastry Cream
- 3 extra-large egg yolks, at room temperature
- 6 Tbsp sugar
- 1 1/4 Tbsp cornstarch
- 1 c. milk
- 1 Tbsp butter
- 1/2 tsp. vanilla extract
- 1 Tbsp heavy cream
For the Fruit Topping
- Any fresh fruit, sliced
- Apricot/Apple Jelly, for glazing (optional)
To make the tart shell, whisk together the egg yolk, cream and vanilla in a small bowl; set aside.
Place the flour, sugar, and salt in a food processor. Process briefly to combine. Scatter the butter pieces over the flour mixture; process to cut the butter into the flour until the mixture resembles coarse meal, about fifteen 1-second pulses.
With the machine running, add the egg mixture and process until the dough just comes together, about 12 seconds. Turn the dough onto a sheet of plastic wrap and press into a 6-inch dish. Wrap in plastic wrap and refrigerate at least 1 hour or up to 48 hours.
Remove the dough from the refrigerator. (If refrigerated for more than an hour, let stand at room temperature until malleable.) Unwrap and roll the dough out on a lightly floured surface to a 13-inch round. Transfer the dough to a 9-inch tart pan. Mold the dough to the sides of the tart pan and remove the excess off the top. Set the dough-lined tart pan on a large plate and freeze for 30 minutes.
Meanwhile, adjust an oven rack to middle position. Preheat the oven to 375° F. Set the dough-lined tart pan on a baking sheet, press a 12-inch square of foil into the frozen shell and over the edge, and fill with pie weights (dried beans work, too!).
Bake for 30 minutes, rotating halfway through the baking time. Remove from the oven and carefully remove the foil and weights. Continue to bake until deep golden brown, 5-8 minutes longer. Transfer to a wire rack to cool.
To make the pastry cream, heat the half-and-half, 6 tablespoons of the sugar, and the salt in a saucepan over medium-high heat until simmering, stirring occasionally to dissolve the sugar.
Meanwhile, combine the egg yolks and remaining 2 tablespoons sugar in a medium bowl and whisk until the sugar has begun to dissolve and the mixture is creamy, about 15 seconds. Whisk in the cornstarch until combined and the mixture is pale yellow and thick, about 30 seconds.
When the half-and-half mixture has reached a simmer, slowly add it to the egg yolk mixture to temper, whisking constantly. Return the mixture to the saucepan, scraping the bowl with a rubber spatula. Return the mixture to a simmer over medium heat, whisking constantly, until a few bubbles burst on the surface and the mixture is thickened and glossy, about 30 seconds.
Off the heat, whisk in the butter and vanilla. Strain the pastry cream through a fine mesh sieve set over a medium bowl. Press plastic wrap directly on the surface to prevent a skin from forming and refrigerate until cold and set, at least 3 hours and up to 2 days.
To assemble the tart, spread the cold pastry cream evenly over the bottom of the tart shell. Arrange the fruit on top of the pastry cream as desired. Heat the jelly in the microwave for 20-30 seconds, just until slightly melted and easy to stir. Using a pastry brush, paint a light layer of jelly over the fresh fruit. Serve.
Recipe adapted from Annie's Eats & Ina Garten
Eggplant Parmesan
Sometimes, I like to plan a vegetarian night just to break up the routine a little. However, my meat loving family doesn't always love my vegetarian nights and seem to go for snacks not long after dinner. That is, until I found this recipe. It's a hit in my house and I love that it is healthy and and filling! Both Rob & Josh love this meal and don't even miss the meat.

Ingredients: (Serves 3-4)
1 lb. globe eggplant, cut into ¼-inch thick rounds
1½ tsp. kosher salt
3 oz. high-quality white bread, torn into chunks
1½ oz. freshly grated Parmesan cheese, about ¾ cup
Pinch of salt
1/2 tsp. pepper
¾ cup all-purpose flour
2 large eggs
3 tbsp. vegetable oil
Spaghetti Sauce (either jarred or homemade)
1/2 c. mozzarella cheese
1/4 c. parm
Directions:
To prepare the eggplant, toss the eggplant slices with the kosher salt in a large bowl until combined. Transfer the salted eggplant to a colander and set the colander over the now empty bowl. Let stand until the eggplant releases at least 1 tablespoon liquid, 30-45 minutes.
Spread the eggplant slices on a triple thickness of paper towels (or layers of clean kitchen towels); cover with another triple thickness of paper towels. Press firmly on each slice to remove as much liquid as possible. Wipe off any excess salt.
**The salting of the eggplant is an important step as it helps to get rid of some of the bitterness that eggplant has. The salt also draws the moisture from the eggplant so your eggplant will not get mushy during cooking. If you don't have time for the salting/draining steps, the recipe will still work fine.
While the eggplant is draining, place a rimmed baking sheet in the oven and preheat to 425˚ F.
Pulse the bread in a food processor to fine crumbs (about 15 1-second pulses). You should have about 3 cups. Transfer the crumbs to a pie plate and mix in the cheese, salt, and ¼ teaspoon pepper; set aside.
Combine the flour and ¾ teaspoon pepper on a plate. Beat the eggs in a second plate.
Dredge the eggplant slices in the flour, making sure to shake off the excess. Dip teh dredged eggplant slices in the egg. Then coat the slices with the bread crumb mixture, making sure to firmly press each slice into the bread crumbs so it is fully coated.
Set the breaded slices on a wire rack or plate. Repeat with the remaining eggplant until all the slices are breaded.
Remove the preheated baking sheet from the oven. Add the vegetable oil to the sheet and tilt to coat evenly. Place the breaded eggplant slices on the baking sheet in a single layer. Bake until the eggplant is well browned and crisp, about 30 minutes, flipping the slices after 15 minutes. Do not turn off the oven after the slices are baked.
While the eggplant is baking, heat your preferred tomato sauce.
To assemble the dish, spread ½ cup of the sauce in the bottom of a 2-quart casserole dish. Layer in half of the eggplant slices, overlapping the slices to fit. Spread with another ½ cup of the sauce. Sprinkle with half of the mozzarella. Layer in the remaining eggplant and dot with the remaining sauce, leaving the majority of the eggplant exposed so it will remain crisp. Sprinkle with the Parmesan cheese and the remaining mozzarella. Bake until bubbling and the cheese is browned, 13-15 minutes.
 Serve this over pasta and enjoy!
Source: Annie's Eats

Ingredients: (Serves 3-4)
1 lb. globe eggplant, cut into ¼-inch thick rounds
1½ tsp. kosher salt
3 oz. high-quality white bread, torn into chunks
1½ oz. freshly grated Parmesan cheese, about ¾ cup
Pinch of salt
1/2 tsp. pepper
¾ cup all-purpose flour
2 large eggs
3 tbsp. vegetable oil
Spaghetti Sauce (either jarred or homemade)
1/2 c. mozzarella cheese
1/4 c. parm
Directions:
To prepare the eggplant, toss the eggplant slices with the kosher salt in a large bowl until combined. Transfer the salted eggplant to a colander and set the colander over the now empty bowl. Let stand until the eggplant releases at least 1 tablespoon liquid, 30-45 minutes.
Spread the eggplant slices on a triple thickness of paper towels (or layers of clean kitchen towels); cover with another triple thickness of paper towels. Press firmly on each slice to remove as much liquid as possible. Wipe off any excess salt.
**The salting of the eggplant is an important step as it helps to get rid of some of the bitterness that eggplant has. The salt also draws the moisture from the eggplant so your eggplant will not get mushy during cooking. If you don't have time for the salting/draining steps, the recipe will still work fine.
While the eggplant is draining, place a rimmed baking sheet in the oven and preheat to 425˚ F.
Pulse the bread in a food processor to fine crumbs (about 15 1-second pulses). You should have about 3 cups. Transfer the crumbs to a pie plate and mix in the cheese, salt, and ¼ teaspoon pepper; set aside.
Combine the flour and ¾ teaspoon pepper on a plate. Beat the eggs in a second plate.
Dredge the eggplant slices in the flour, making sure to shake off the excess. Dip teh dredged eggplant slices in the egg. Then coat the slices with the bread crumb mixture, making sure to firmly press each slice into the bread crumbs so it is fully coated.
Set the breaded slices on a wire rack or plate. Repeat with the remaining eggplant until all the slices are breaded.
Remove the preheated baking sheet from the oven. Add the vegetable oil to the sheet and tilt to coat evenly. Place the breaded eggplant slices on the baking sheet in a single layer. Bake until the eggplant is well browned and crisp, about 30 minutes, flipping the slices after 15 minutes. Do not turn off the oven after the slices are baked.
While the eggplant is baking, heat your preferred tomato sauce.
To assemble the dish, spread ½ cup of the sauce in the bottom of a 2-quart casserole dish. Layer in half of the eggplant slices, overlapping the slices to fit. Spread with another ½ cup of the sauce. Sprinkle with half of the mozzarella. Layer in the remaining eggplant and dot with the remaining sauce, leaving the majority of the eggplant exposed so it will remain crisp. Sprinkle with the Parmesan cheese and the remaining mozzarella. Bake until bubbling and the cheese is browned, 13-15 minutes.

Source: Annie's Eats
Monday, May 2, 2011
Weekly Menu
Monday - Eggplant Parmesan, Caprese Salad
Tuesday - Shepherd's Pie
Wednesday - Chicken Divan
Thursday - Cinco De Mayo Taco Night
Friday - Out for Anniversary (just a month late) at The Lark
Saturday - Crispy Chicken Tacos, Shrimp Ceviche, homemade salsa & guacamole
Sunday - Mothers Day (will post the menu later)
Tuesday - Shepherd's Pie
Wednesday - Chicken Divan
Thursday - Cinco De Mayo Taco Night
Friday - Out for Anniversary (just a month late) at The Lark
Saturday - Crispy Chicken Tacos, Shrimp Ceviche, homemade salsa & guacamole
Sunday - Mothers Day (will post the menu later)
Subscribe to:
Comments (Atom)